· 15 min read
Welcome to markdowneditorai.com
A complete tour of Markdown Editor AI: a free, private, browser-based toolkit for writing Markdown, building tables, exporting PDFs, converting HTML, and formatting Discord messages.
By Markdown Editor AI Team
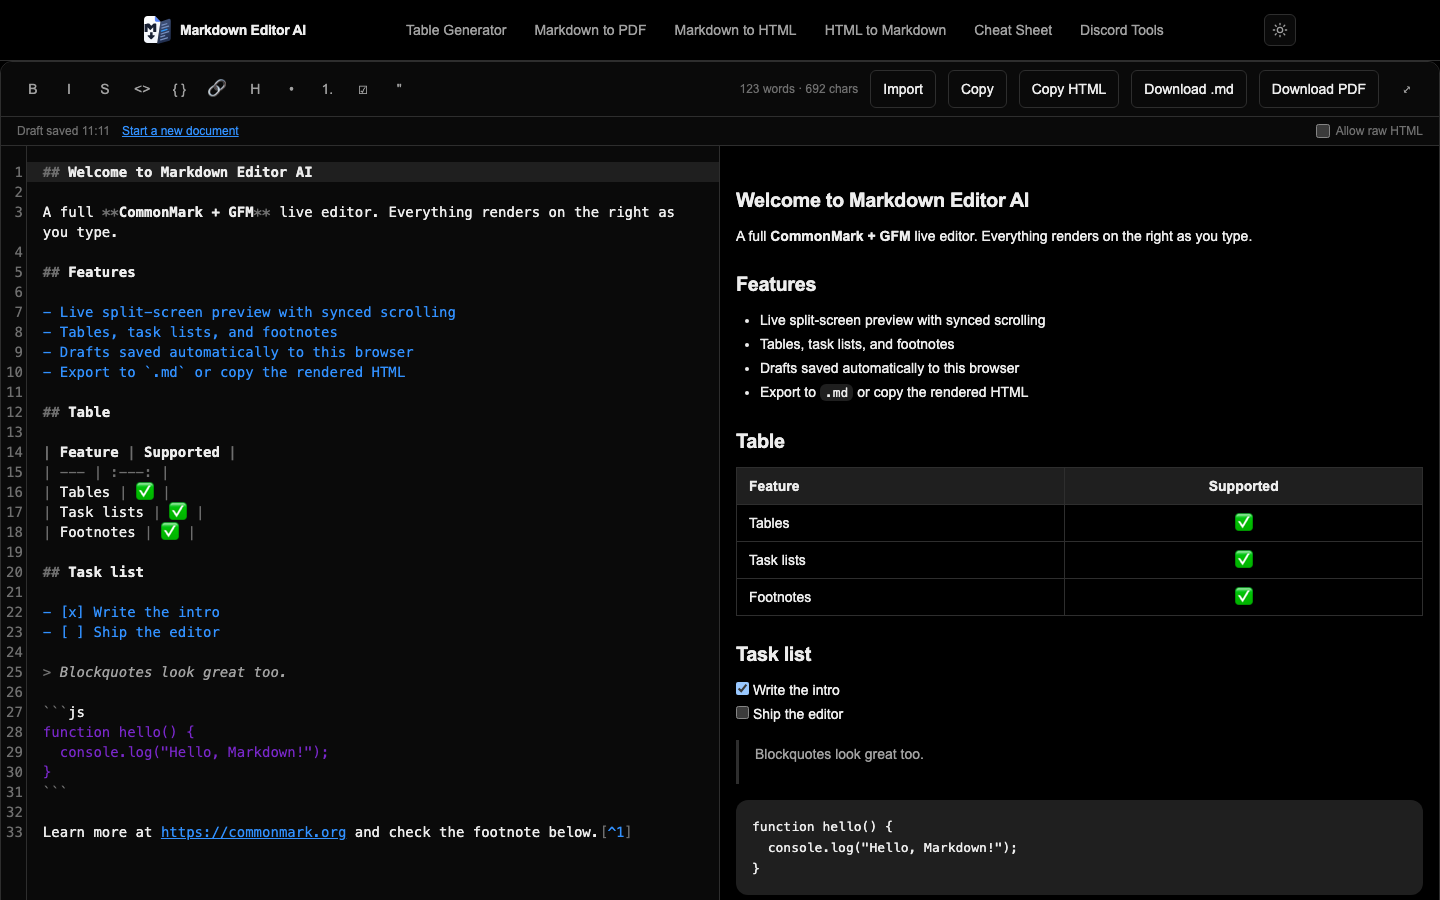
Welcome to markdowneditorai.com. If you have ever typed a README, a set of meeting notes, a technical document, or a Discord announcement and wondered “what is this actually going to look like?”, this site was built for you.
Markdown Editor AI is a free collection of Markdown tools that run entirely in your web browser. There is no account to create, no upload step, and no paywall. You open a page, write or paste your text, see the result instantly, and copy or download what you need. That is the whole idea.
In this post we will walk through every tool on the site, what each one is for, and exactly how to use it.
What is Markdown, and why does it need tools?
Markdown is a lightweight way to add structure to plain text. You type **bold** and get bold; you start a line with # and get a heading. It powers GitHub READMEs, documentation sites, note-taking apps like Obsidian, static-site generators, and chat apps.
The trouble is that Markdown is easy to write but surprisingly easy to get wrong. A single unclosed backtick can swallow the rest of a sentence, tables need pipes in exactly the right places, and every platform supports a slightly different flavor: GitHub has tables and task lists, while Discord has underline and spoilers but no tables at all.
Markdown Editor AI closes that gap. Every tool shows you a live preview as you type, follows the specification of the dialect you are targeting, and lets you export the result in the format you actually need.
Our principles: free, private, and fast
Before we dive into the tools, here are the three promises that shape everything on the site.
- Your text never leaves your device. Every editor, converter, and generator runs in your browser. Nothing you type is sent to our servers or to any third-party service. You can even disconnect from the internet after the page loads and keep working.
- No accounts and no paywalls. There is nothing to sign up for and nothing to unlock. Every feature described in this post is available to everyone, for free, with no usage limits.
- Fast by design. Pages are generated ahead of time and ship interactive code only where it is needed.
A quick map of the site
The site is organized into two families of tools, plus reference material:
| Tool | What it does | Address |
|---|---|---|
| Markdown Editor | Live CommonMark + GFM editor with preview | / |
| Table Generator | Build Markdown tables in a spreadsheet grid | /markdown-table-generator |
| Markdown to PDF | Export Markdown to a print-ready PDF | /markdown-to-pdf |
| Markdown to HTML | Convert Markdown into clean HTML | /markdown-to-html |
| HTML to Markdown | Turn HTML or rich text into Markdown | /html-to-markdown |
| Markdown Cheat Sheet | Every syntax rule with live examples | /markdown-cheat-sheet |
| Discord Markdown Editor | Preview messages exactly as Discord shows them | /discord-markdown-editor |
| Discord Cheat Sheet | Discord’s own formatting rules | /discord-markdown-cheat-sheet |
| ANSI Color Generator | Colored text for Discord code blocks | /discord-ansi-color-generator |
| Timestamp Generator | Discord timestamps that adapt to every time zone | /discord-timestamp-generator |
You can reach all of these from the navigation bar at the top of every page. On smaller screens, tap Menu to see the full list. The Discord tools are grouped under the Discord Tools menu.
1. The Markdown Editor
The home page is the heart of the site: a full-featured, split-screen Markdown editor (pictured at the top of this post). You write Markdown on the left, and a rendered preview updates on the right with every keystroke.
What it supports
The editor follows CommonMark, the standardized Markdown specification, plus GitHub Flavored Markdown (GFM). That means you get everything you would expect on GitHub:
- Headings, paragraphs, emphasis, and strikethrough
- Ordered, unordered, and nested lists
- Task lists with checkboxes (
- [ ]and- [x]) - Tables with left, center, or right column alignment
- Fenced code blocks with language tags
- Blockquotes, horizontal rules, links, and images
- Footnotes (
[^1]) and automatic links
The source pane has syntax highlighting and line numbers, so headings, links, lists, and code stand out while you type. The two panes also scroll in sync: as you move through a long document, the preview follows along and highlights the block you are editing.
How to use the toolbar
Across the top of the editor is a formatting toolbar. Select some text and click a button to apply formatting, or click a button with nothing selected to insert the syntax at your cursor. Every common action also has a keyboard shortcut (use Cmd on macOS and Ctrl on Windows and Linux):
| Action | Shortcut | Inserts |
|---|---|---|
| Bold | Cmd/Ctrl + B |
**text** |
| Italic | Cmd/Ctrl + I |
_text_ |
| Strikethrough | Cmd/Ctrl + Shift + X |
~~text~~ |
| Inline code | Cmd/Ctrl + E |
`text` |
| Code block | Cmd/Ctrl + Shift + E |
a fenced block |
| Link | Cmd/Ctrl + K |
[text](https://) |
| Heading | Cmd/Ctrl + Shift + H |
## |
| Bulleted list | Cmd/Ctrl + Shift + 8 |
- |
| Numbered list | Cmd/Ctrl + Shift + 7 |
1. |
| Quote | Cmd/Ctrl + Shift + . |
> |
There is also a Task button that turns the current line into a checklist item. Hover over any button to see its shortcut.
Importing, copying, and exporting
On the right side of the toolbar you will find a live word and character count, followed by the actions that get your work in and out of the editor:
- Import opens a
.md,.markdown, or.txtfile from your computer. Even faster: drag a Markdown file from your desktop and drop it straight onto the editor. - Copy copies your Markdown source to the clipboard.
- Copy HTML copies the rendered HTML, ready to paste into a CMS or email template.
- Download .md saves your document as a Markdown file (shortcut:
Cmd/Ctrl + S). The file name is taken from your first heading. - Download PDF exports the rendered preview as a PDF in one click.
Zen mode and raw HTML
When you want to focus, click the expand icon at the far right of the toolbar or press Cmd/Ctrl + Shift + Enter. Zen mode expands the editor to fill the entire window and hides everything else. Press Esc to return.
By default, raw HTML tags in your Markdown are shown as text rather than rendered, which keeps the preview safe. If your document intentionally uses HTML (for example, <details> blocks or <kbd> tags), tick Allow raw HTML beneath the toolbar. Even then, the output is cleaned with a sanitizer, so scripts and other dangerous content are never executed.
2. The Markdown Table Generator
Markdown tables are notoriously fiddly to type by hand. The Table Generator lets you build them in a familiar spreadsheet-style grid instead.
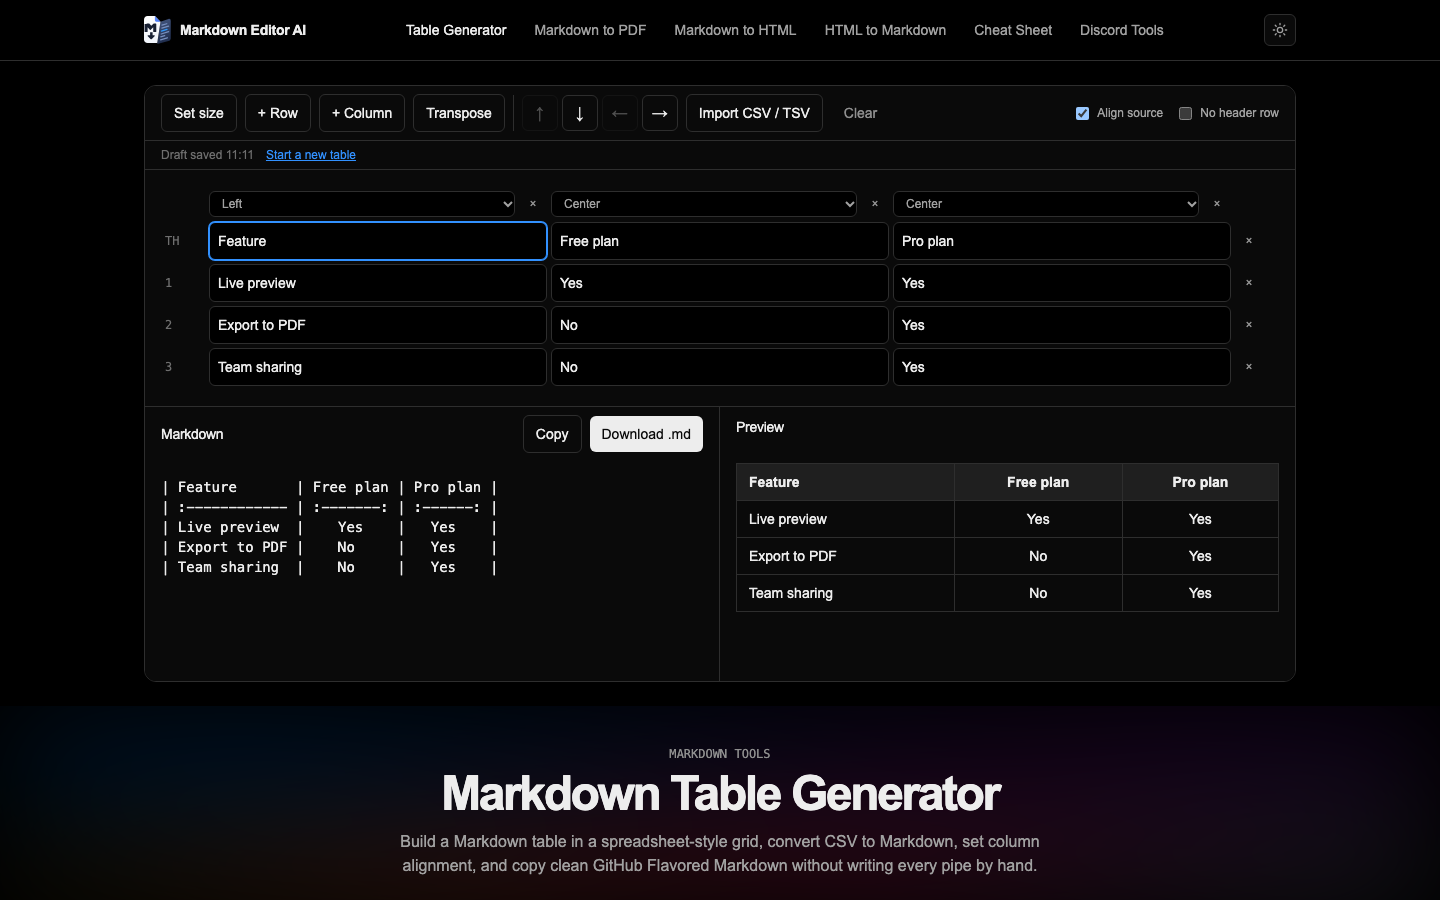 Fill the grid, set alignment per column, and copy clean GFM table Markdown.
How to build a table
- Pick a size. Click Set size and hover over the mini grid to choose the number of columns and rows, up to 15 × 15. You can always add more later with + Row and + Column.
- Type into the cells. The first row (marked
TH) is your header. Remove any row or column with the small × button next to it. - Set alignment. Above each column is a dropdown: Default, Left, Center, or Right. The generator writes the matching colons into the delimiter row for you.
- Rearrange. Select a cell and use the arrow buttons to move its row up or down, or its column left or right. Transpose swaps rows and columns in one click.
- Copy or download. The generated Markdown appears below the grid, next to a live preview. Click Copy or Download .md.
Importing existing data
Already have your data in Excel or Google Sheets? Copy a range and paste it straight into a cell; tab-separated data expands across the grid automatically. For more control, click Import CSV / TSV and paste CSV, TSV, semicolon-separated data, or even an existing Markdown table you want to edit.
Two options fine-tune the output. Align source pads the columns with spaces so the raw Markdown lines up neatly in plain text. No header row treats every row as data. Pipe characters inside cells are escaped automatically, and line breaks become <br> tags so multi-line cells still work.
3. Markdown to PDF
Sometimes Markdown needs to become a document you can email, print, or attach to a ticket. The Markdown to PDF tool turns your Markdown into a polished PDF without a print dialog and without any upload.
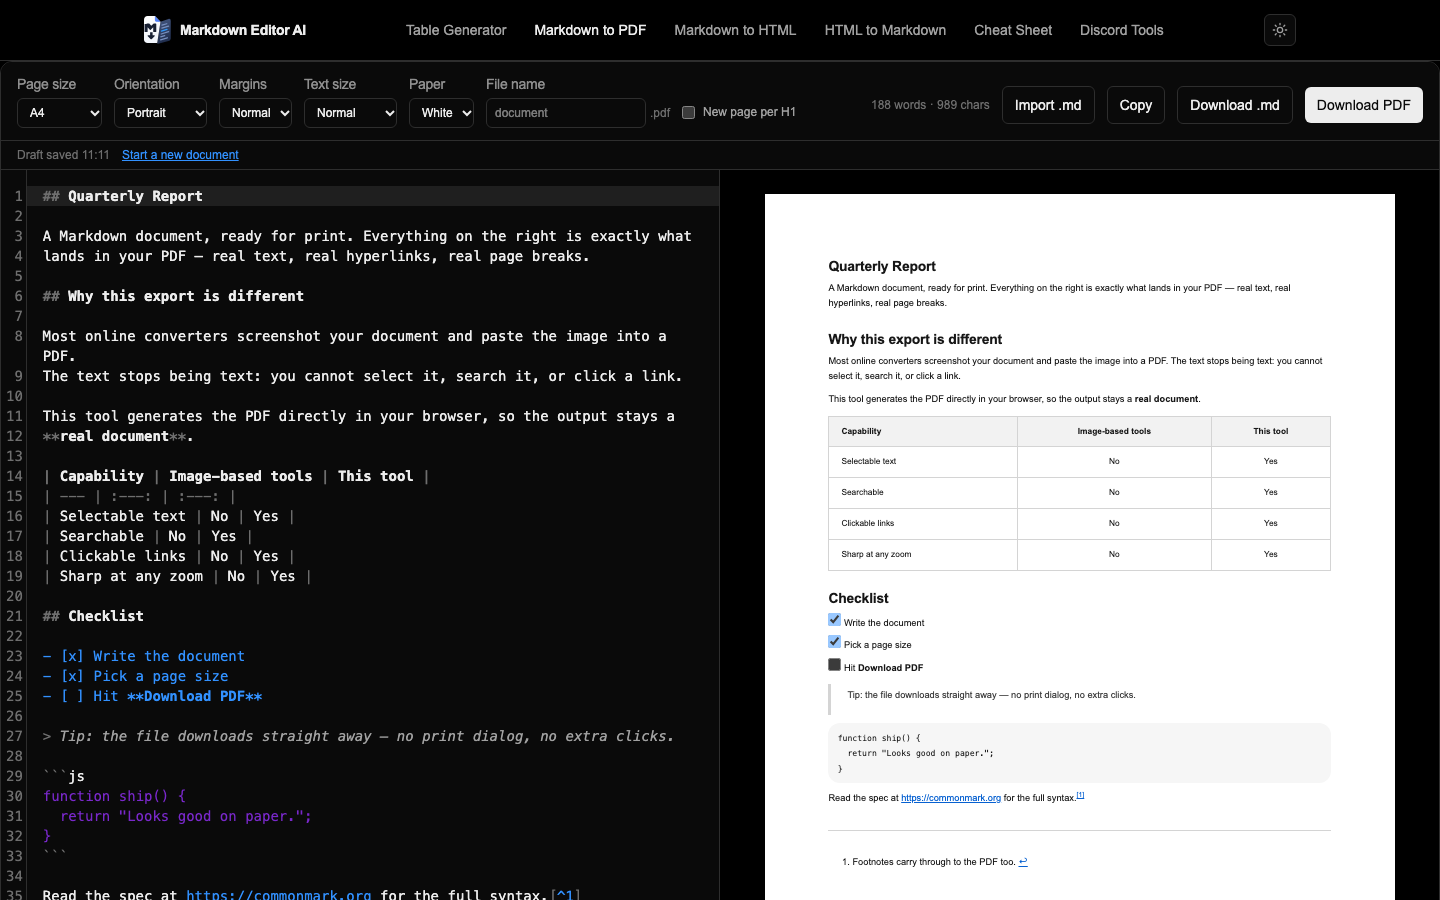 Choose page size, margins, and theme, then preview the exact page before downloading.
How to export a PDF
- Write or paste your Markdown on the left, or use Import .md to load a file.
- Adjust the layout using the options bar:
- Page size: A4, US Letter, US Legal, or A5
- Orientation: Portrait or Landscape
- Margins: None, Narrow, Normal, or Wide
- Text size: Small, Normal, Large, or Extra large
- Paper: White, or Dark for a dark-themed document
- File name: defaults to your first heading
- New page per H1: start each top-level section on a fresh page
- Check the preview on the right, which is drawn at real page dimensions so what you see is what you get.
- Click Download PDF. The file is generated in your browser and saved straight to your downloads folder.
The exporter avoids splitting code blocks, images, and table rows across pages, and keeps headings attached to the content that follows them. Because the PDF is rendered as a high-resolution image of the preview, it looks identical in every viewer; the trade-off is that its text is not selectable.
4. Markdown to HTML
The Markdown to HTML converter is for when you need the actual HTML code: pasting into a CMS, a newsletter tool, an email template, or a static web page.
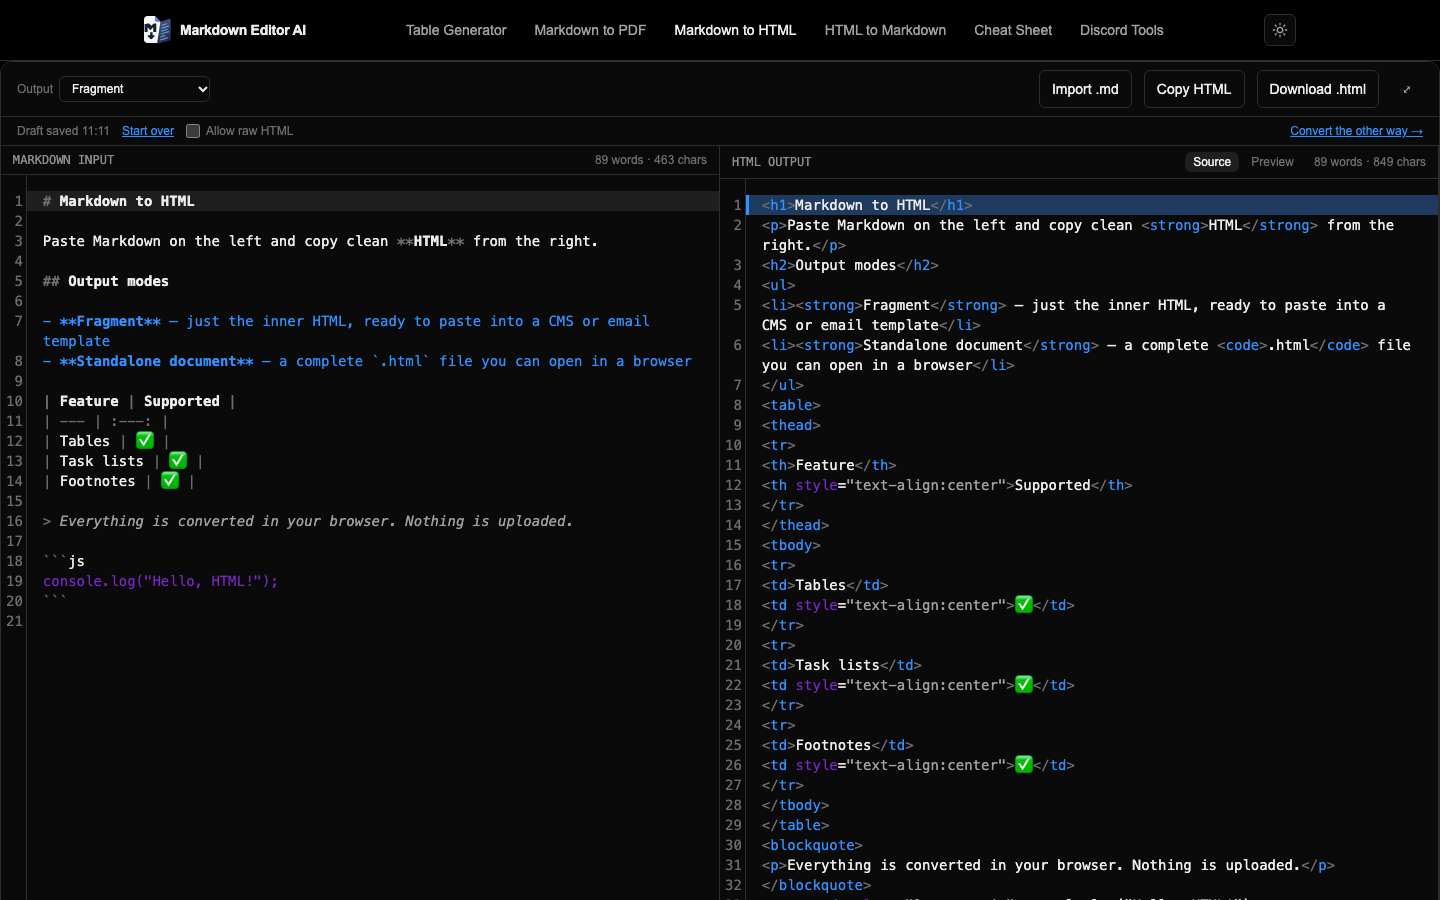 Paste Markdown on the left and get clean HTML on the right.
How to use it
Type or paste Markdown into the left pane (or click Import .md). The HTML appears instantly on the right. Use the Output selector to pick the format you need:
- Fragment produces just the HTML for your content, with no
<html>,<head>, or<body>tags. This is what you want for pasting into an existing page or CMS. - Standalone document produces a complete, valid HTML5 file. You can set the page Title (it defaults to your first heading) and tick Include basic CSS to embed a clean, readable stylesheet that supports both light and dark mode.
Switch between Source and Preview above the output to see either the raw code or the rendered page. When you are happy, click Copy HTML or Download .html. The converter supports the same GFM features as the main editor, including tables, task lists, and footnotes, and the same opt-in Allow raw HTML setting.
5. HTML to Markdown
The HTML to Markdown converter works in the opposite direction. It is ideal for migrating old blog posts, moving documentation between platforms, or cleaning up content copied from the web.
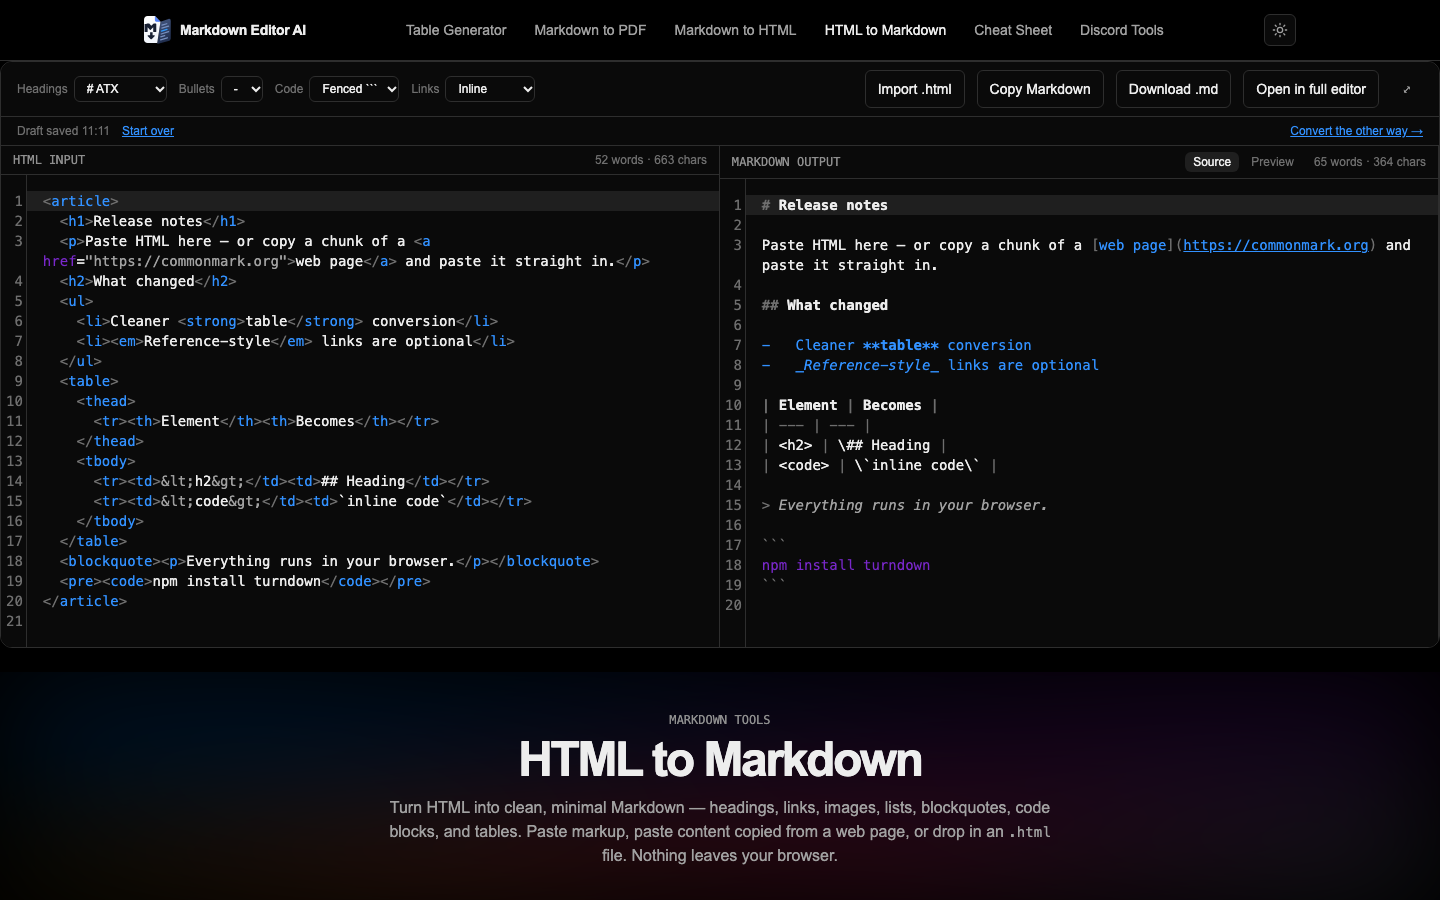 Paste HTML, or rich text from a web page or document, and get tidy Markdown back.
How to use it
There are three ways to get content in:
- Paste raw HTML into the left pane.
- Paste rich text copied from a web page, Google Docs, or Microsoft Word. The converter reads the formatting behind the clipboard, so headings, lists, links, and tables survive the trip.
- Import .html, or drag and drop an HTML file onto the input pane.
The Markdown output appears on the right. Four options let you match the style of your project:
- Headings: ATX (
# Heading) or Setext (underlined with===) - Bullets:
-,*, or+ - Code: fenced with backticks, or indented
- Links: inline (
[text](url)) or reference style ([text][1])
HTML tables become GFM pipe tables. Anything with no Markdown equivalent, such as scripts, styles, iframes, and forms, is safely removed, and the converter tells you what was stripped.
When you are done, click Copy Markdown or Download .md. If you want to keep editing, Open in full editor sends the result straight to the main Markdown Editor.
6. The Markdown Cheat Sheet
Can’t remember how to write a footnote, or how to align a table column? The Markdown Cheat Sheet is a complete reference organized into clear sections: headings, emphasis, lists, links and images, code, blockquotes and rules, tables, and extended syntax.
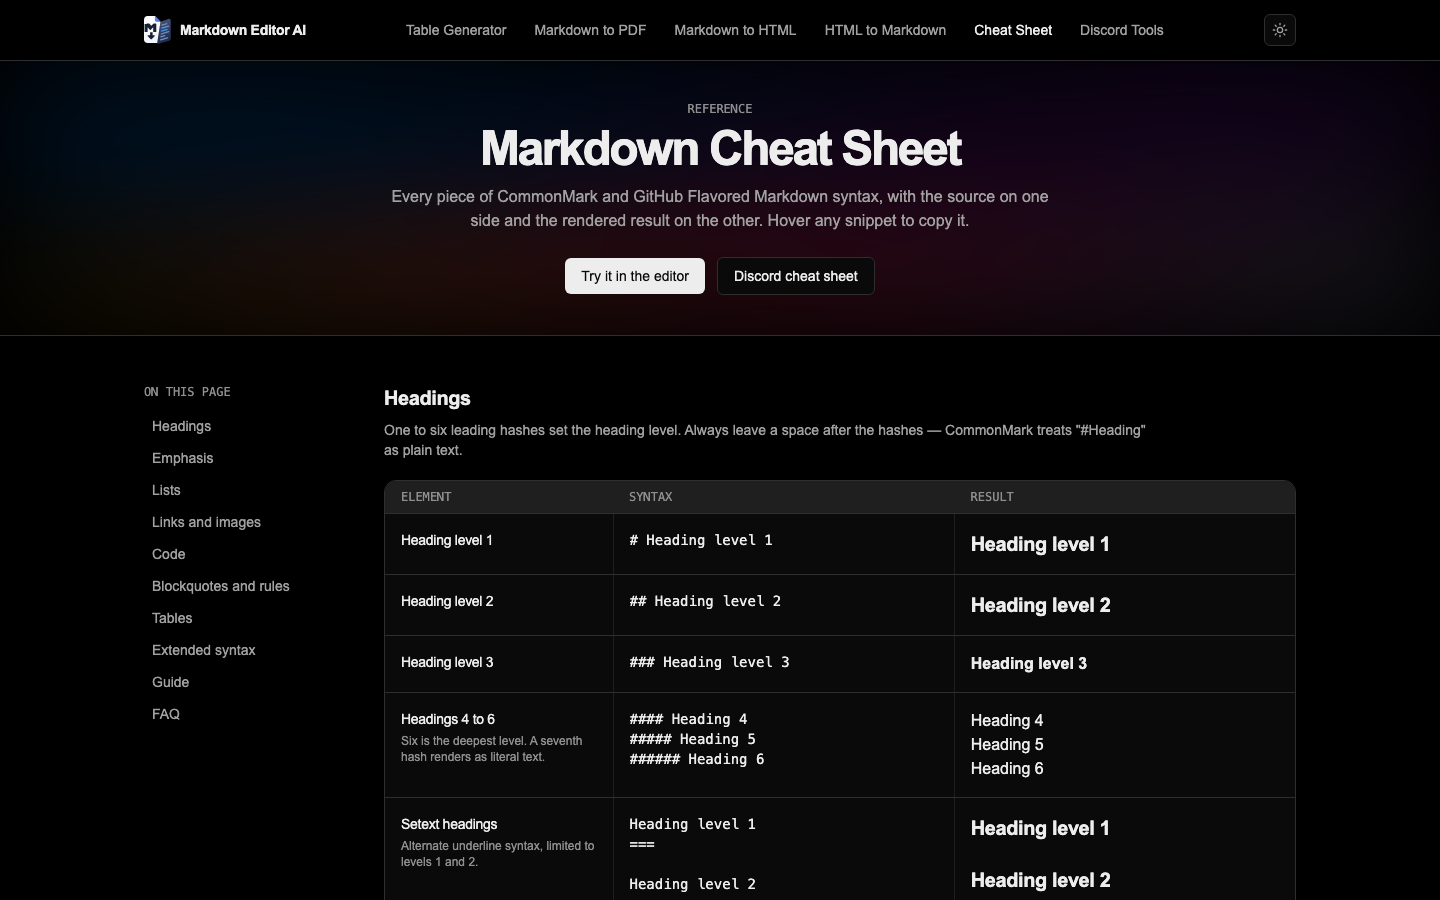 Every rule shows the syntax and the rendered result side by side.
Each entry shows the element name, the exact syntax, and the rendered result, produced by the same renderer the editor uses. Hover over any snippet and click Copy to grab it.
7. The Discord Markdown Editor
Discord uses its own flavor of Markdown. It looks familiar, but it behaves differently enough that a general Markdown editor would mislead you. Discord supports underline, spoilers, subtext, and mentions, but has no tables, images, or task lists. The Discord Markdown Editor previews your message exactly the way Discord will display it.
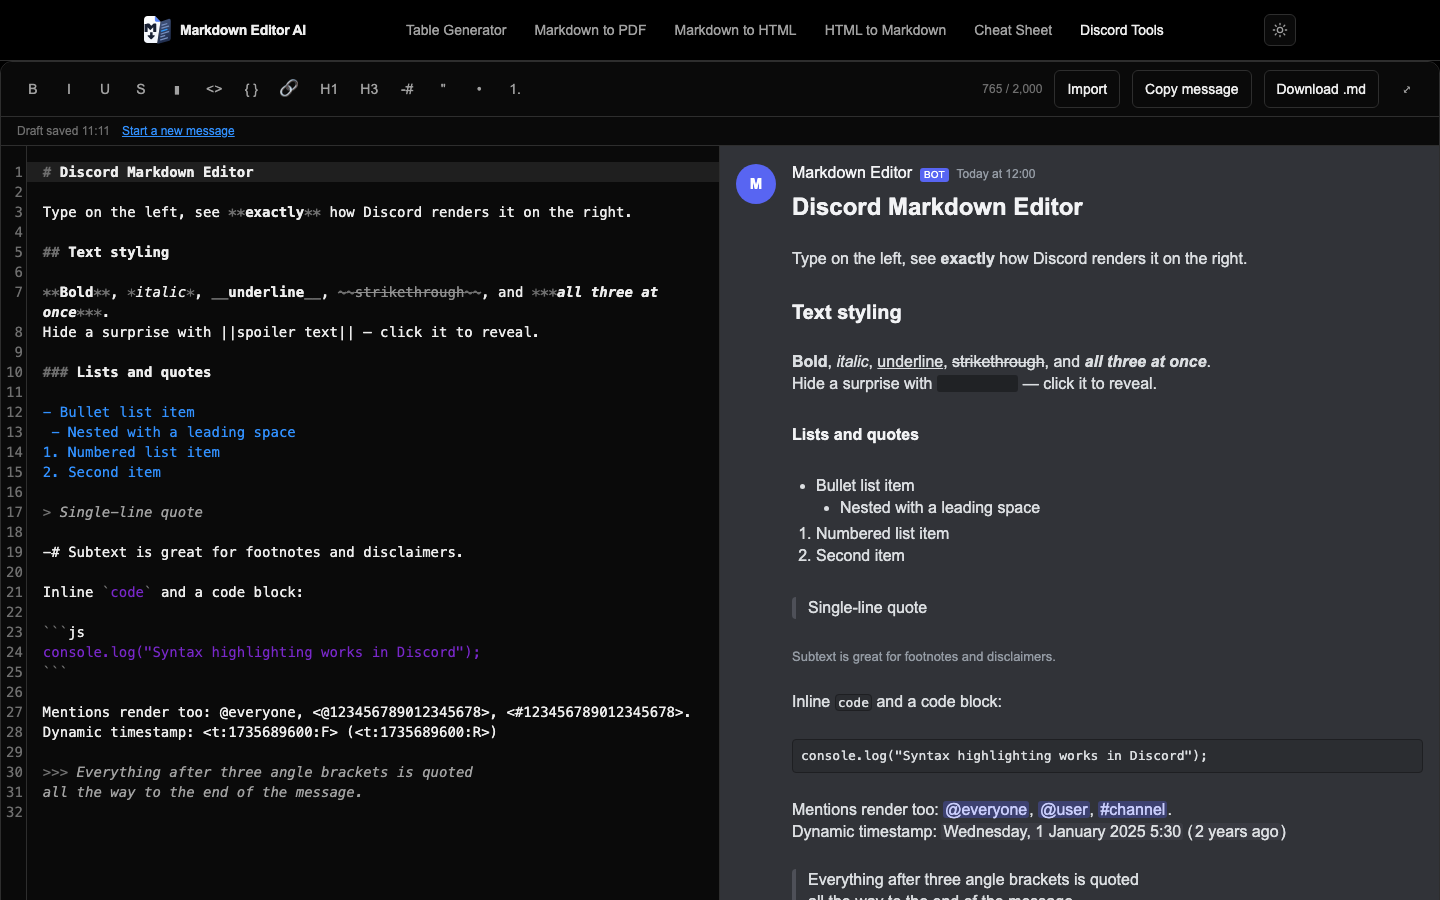 Compose on the left; the right pane mirrors Discord’s own message styling.
How to use it
Write your message on the left and watch the Discord-styled preview on the right. The toolbar includes the formatting Discord actually supports:
- Bold (
Cmd/Ctrl + B), Italic (Cmd/Ctrl + I), and Underline (Cmd/Ctrl + U) - Strikethrough (
Cmd/Ctrl + Shift + X) and Spoiler (Cmd/Ctrl + Shift + S), which wraps text in||bars. Click a spoiler in the preview to reveal it, just like in Discord. - Inline code, Code block, and Masked link
- Big header (
#), Small header (###), and Subtext (-#) - Quote, Bulleted list, and Numbered list
The preview also renders user, role, and channel mentions, @everyone and @here, custom emoji, and dynamic timestamps.
A live character counter sits next to the toolbar. Discord limits regular messages to 2,000 characters, and the counter turns red and shows a warning when you go over, including a note when your message would still fit within the 4,000-character Nitro limit. When the message is ready, click Copy message or press Cmd/Ctrl + Enter, then paste it into Discord.
8. The Discord ANSI Color Generator
Discord does not let you color normal text, but it does render ANSI color codes inside code blocks tagged ansi. Writing those escape codes by hand is painful. The ANSI Color Generator lets you paint colors onto text visually instead.
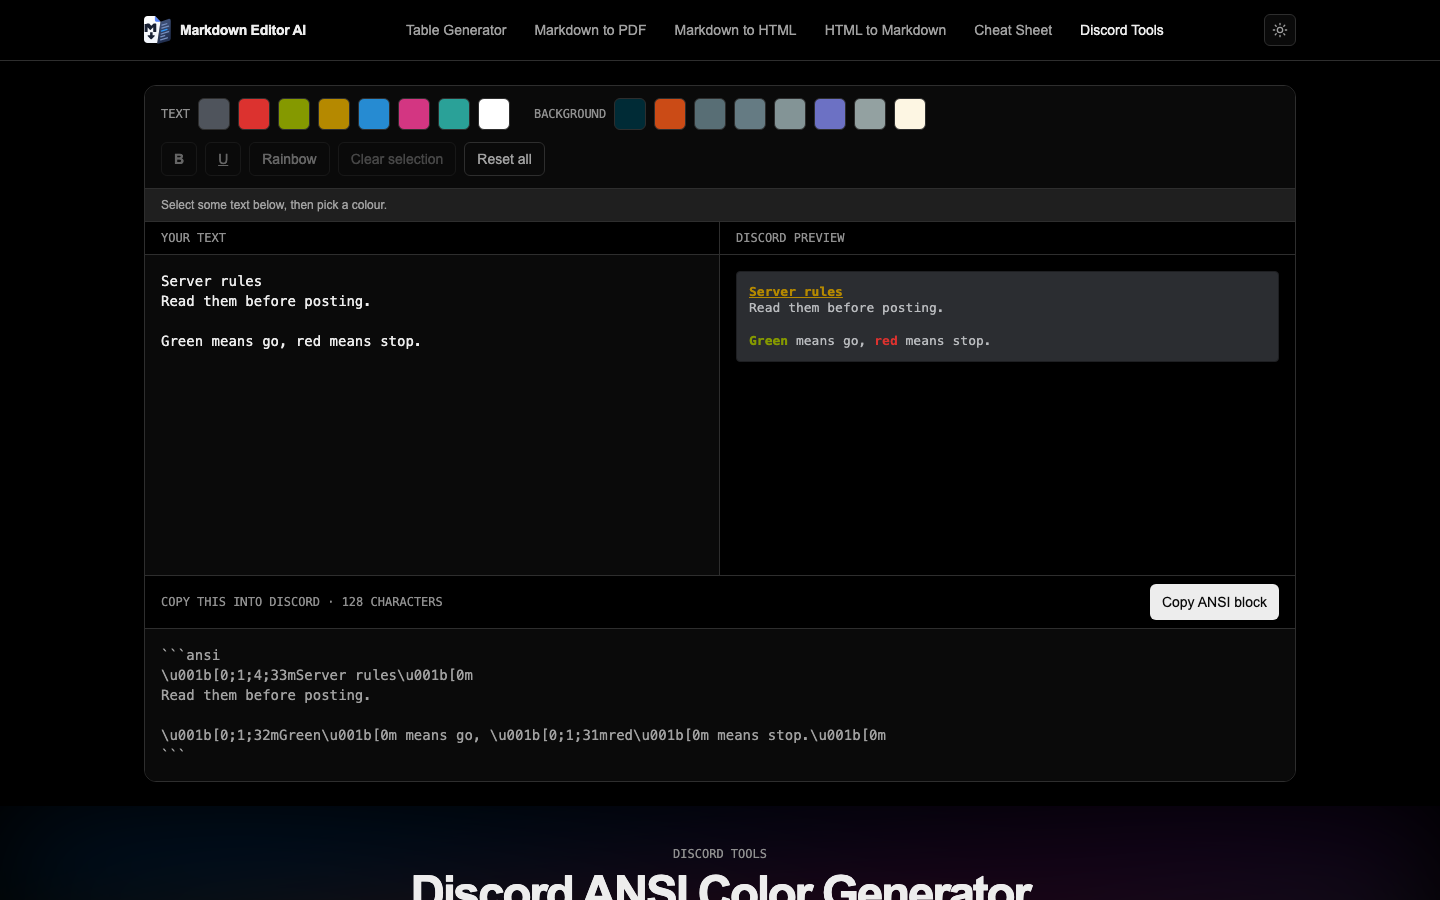 Select text, click a color, and copy a ready-to-paste ANSI code block.
How to use it
- Type or paste your text into the Your text box.
- Select the words you want to style.
- Click one of the eight Text colors (dark gray, red, green, gold, blue, pink, teal, or white) and, optionally, one of the eight Background colors.
- Use B for bold and U for underline. Rainbow cycles colors word by word across your selection for a playful effect.
- Clear selection removes styling from the selected text, and Reset all starts fresh.
The Discord preview shows exactly how the result will look in the app. Below it, the generated code block updates live along with a character count, because the escape codes count toward Discord’s message limit. Click Copy ANSI block and paste it into any channel.
9. The Discord Timestamp Generator
Scheduling an event for a server with members across the globe? Discord timestamps solve the time zone problem: you send a single tag, and every reader sees the time converted to their own local zone. The Timestamp Generator builds those tags for you.
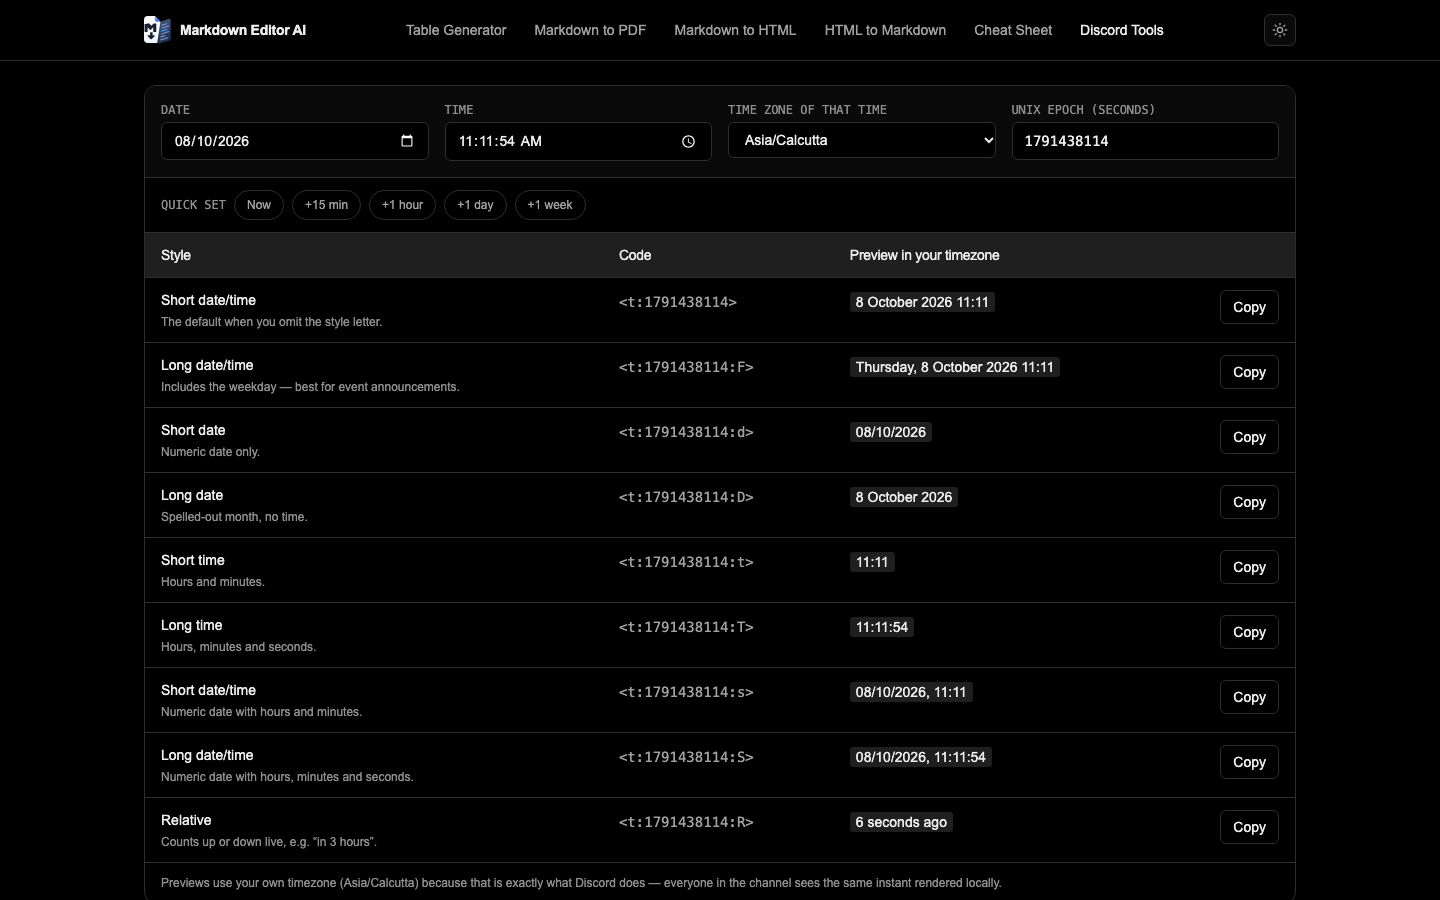 Pick a moment once; every reader sees it in their own time zone.
How to use it
- Choose a Date and Time, and confirm the Time zone (it is detected automatically from your browser). You can also paste a Unix epoch value directly.
- Or use a quick preset: Now, +15 min, +1 hour, +1 day, or +1 week.
- Browse the list of styles. Each one shows a live preview of how it will appear, from short time (
t) and long date (D) to full date and time with weekday (F). The relative style (R) shows a live countdown such as “in 3 hours”. - Click Copy next to the style you want, and paste the tag, for example
<t:1767225600:F>, into your Discord message.
10. The Discord Markdown Cheat Sheet
The Discord Cheat Sheet covers Discord’s formatting, mentions, quotes, code blocks, and timestamp styles. It also lists what Discord does not support, such as tables, images, and horizontal rules, so you do not waste time on syntax that shows up as plain text.
Features that work across every tool
Some of the most useful features are not tied to any single page.
Automatic drafts
Every editor and generator saves your work automatically to your browser’s local storage a moment after you stop typing. The status line under the toolbar shows when the draft was last saved, or “Draft restored from this browser” when you come back. To start fresh, click Start a new document (or Start a new table, Start a new message, and so on). Drafts stay on your device only, so clearing your browser data will remove them.
Light and dark themes
The site opens in a comfortable dark theme. Click the sun/moon button in the top-right corner to switch to light mode. Your choice is remembered on your next visit.
Install it and work offline
Markdown Editor AI is a Progressive Web App. In supported browsers you can install it from the address bar or share menu and open it in its own window. Because all processing happens on your device, the tools keep working on a flaky connection.
Drag and drop, plus keyboard shortcuts
Every editor that accepts files supports drag and drop for files up to 2 MB. Every formatting button has a shortcut, shown with the right modifier key for your platform: ⌘ on a Mac, Ctrl elsewhere.
Three example workflows
Writing a project README. Draft it in the Markdown Editor, build any comparison tables in the Table Generator and paste them back in, then click Download .md and commit the file.
Migrating a blog post. Paste an old article into HTML to Markdown, review the removed elements, and click Open in full editor to polish it before downloading the .md file.
Announcing a community event. Draft the announcement in the Discord Markdown Editor, add a start time from the Timestamp Generator so everyone sees it in their own zone, and finish with a colorful ANSI banner.
Frequently asked questions
Is it really free? Yes. Every tool is free, with no account, no trial, and no usage limits.
Does the site use AI to rewrite my text? No. Despite the name, nothing you type is sent to a language model or any external service. All processing happens locally in your browser.
Can I use the output commercially? Absolutely. You own everything you write and everything the tools generate from it.
How do I report a bug or suggest a feature? Visit our contact page. Including the input you used, your browser, and what you expected to happen helps us fix things quickly.
Get started
The best way to learn Markdown Editor AI is to use it. Open the Markdown Editor, delete the sample text, and start typing. Everything you write stays on your device, every tool is a click away in the navigation bar, and your draft will be waiting for you next time.
Thanks for stopping by, and welcome to markdowneditorai.com. Happy writing!
Ready to write?
Every tool is free, needs no account, and runs entirely in your browser.
Open the editor